9/27/2018

Top 8 Android Screen-Recording Apps for Android 2019

Top 8 Android Screen-Recording Apps for Android 2019

Want to start your own YouTube Android tutorial channel or just take screencasts of your Android device? Instead of using an external camera or computer, you can easily record the screen of your device directly, thanks to a host of apps on the Play Store that can do the job for you.


Also Read: Best Call Recorder App for Android – Record Phone Calls on Android Easily


We’ve compiled a list of the best screen recorders for Android. These have all kinds of fancy features – from magic buttons that auto-adjust your videos to the recording of video games to recordings with super-high frame rates. Read on, take your pick, then record away.
1. RecMe Free Screen Recorder

Price: Free


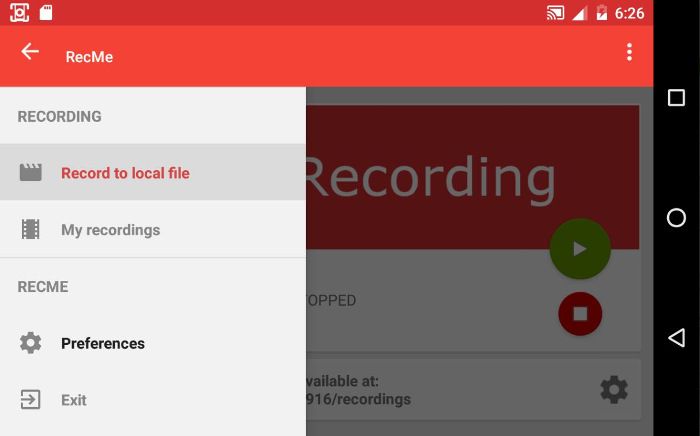
RecMe is one of the few screen recording apps that, when used on a rooted device, can record internal audio as well as video. If you’re not rooted, then you can’t take advantage of the internal audio feature, but you still have plenty to play with on the screen recording front, including up to 60fps 1080p video quality, a front/back camera overlay (for Pro users), and microphone recording.

The UI is nice and friendly – it’s Material Design aesthetic makes it look like it could be an official screen recording app integrated into your phone.

Speaking of which…
2. Google Play Games

Price: Free


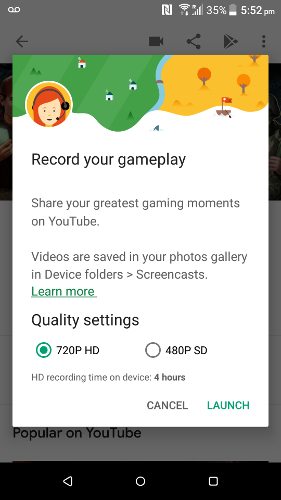
If you want to avoid downloading any third-party apps, and particularly if you mainly want to record gaming stuff, then you can just use the official Play Games app on your Android device.

Just open the Play Games app, go to a game’s info page, then tap the “Record” icon aFst the top of the screen. You’ll get options to record in 480p and 720p, so nothing too high-def, but it’s integrated, so we’re not complaining.

To use this feature to record non-gaming stuff, follow the above steps, then just exit the game when it launches. Simple.
3. DU Recorder

Price: Free


We don’t usually point to Play Store reviews to support our case for why we like an app, but given that DU Recorder is one of the best-reviewed apps we’ve ever seen (4.8/5 with 1.15 million reviews), it feels worth mentioning.

Those reviews are well deserved, too, because this is one of the best-quality and most versatile Android screen recorders out there. Using DU, you can record gameplay vids, save them in multiple resolutions and at liquidy frame rates of up to 60fps. You can record your own voice while recording videos, too, and the packed-in editing suite has everything you need to add pizzazz to your video before putting it online, including cutting, music, background images, and filters like blurring and pixelation. Those million or so people weren’t wrong.
4. Mobizen Screen Recorder

Price: Free


Mobizen is deservedly one of the most popular screen recording apps for Android on the Play Store, offering a wealth of features including full HD recording at 60fps. It has a number of tools for pizazzing up your videos after you’ve recorded them, too, such as background music and the option to record yourself doing intro and outro videos. It’s particularly good for gaming, letting you record your sessions at the same time as recording your face reacting to the on-screen action. (Who knows? You may just be the next PewDiePie … God help us all.)
5. AZ Screen Recorder

Price: Free / $2.99


AZ Screen recorder does not require root access (great start) and has an option to pause and resume recording, which is particularly useful for making tutorial videos. It also has a front-facing camera overlay feature, but it requires a paid upgrade to unlock this. You can change settings like resolution, frame rate, bit rate or even feature a text message or logo along with the recorded screen cast. Microphone recording is supported.
6. ilos Screen Recorder

Price: Free


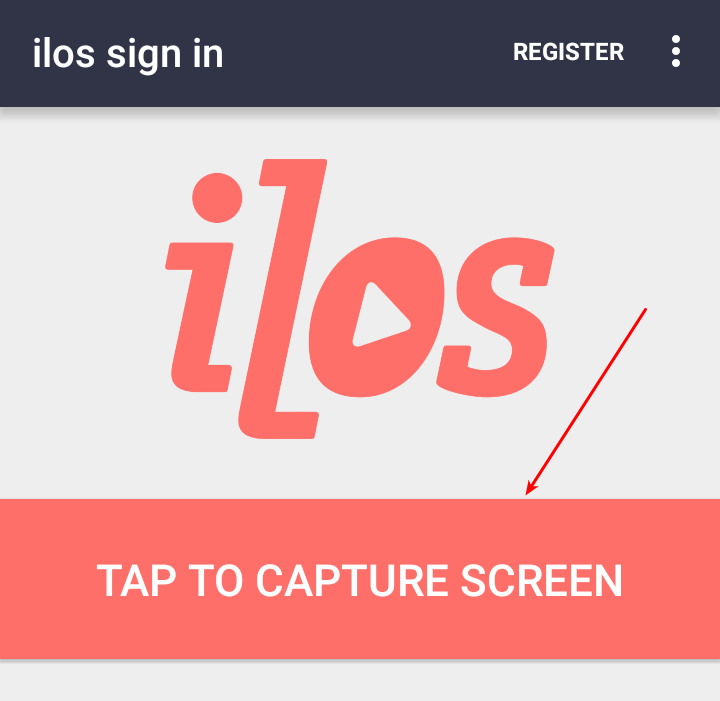
ilos Screen Recorder doesn’t require root, and there are no ads or time limits for screen recording. Once you open the app, it will prompt you to register or sign in, but you can ignore that and tap the big button in the middle to start capturing. It will pop out a notification, and you can hit “Start” to begin recording. You have to go back to the app to stop the recording. Once you are done, you can view your screencasts from within the app or share them using Android’s share feature. It’s not as feature-rich as some of the options here, but it’s much simpler to use.

7. Telecine

Also Read:Is Chromium a Virus? The Difference between Chromium and Chrome
Also Read:What Is Service Host SuperFetch | Fix 100% Disk Usage in Windows 10
Also Read:3 Ways to Use WhatsApp without a Phone Number or SIM in 2019
Also Read:5 Best Free MP3 Tag Editors for You to Download on Windows 10/8/7 2019
Also Read:How to Convert SWF to MP4 on Mac or Windows
Also Read:7 Best iOS Apps to Download Free Music on iPhone/iPad in 2019
Also Read:How to Make Funny Memes on iPhone & Best Meme Maker Apps in 2019
Also Read:How to Permanently Disable Wsappx to Fix 100% Disk Usage in Windows 10Price: Free


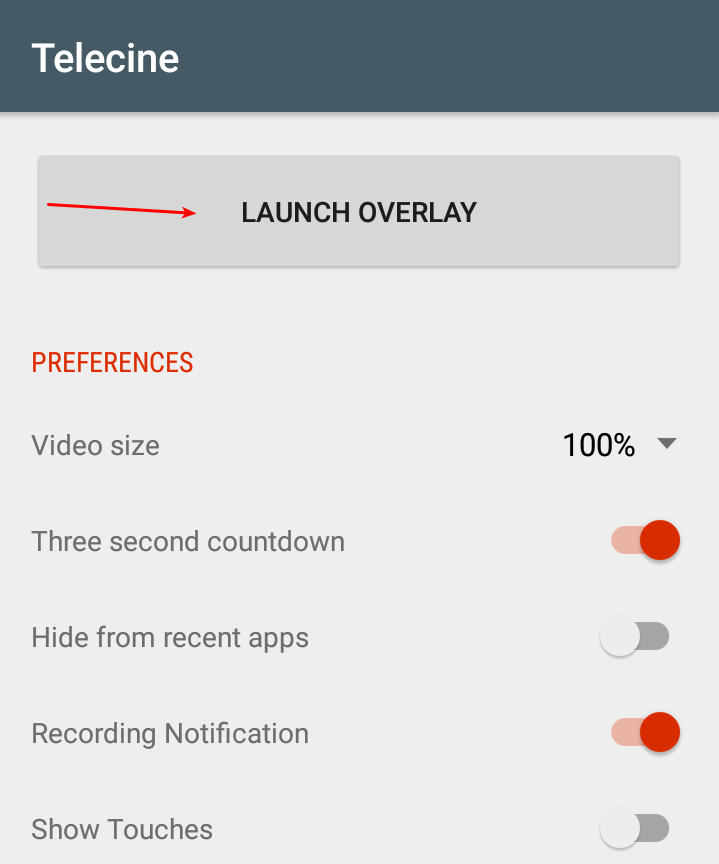
Telecine has a very simple interface with only a few settings, but it is very powerful and works well. Once you’ve opened the app, tap the “Launch Overlay” button. It will pop out a small overlay at the top-right corner of your screen. Navigate away from the app, and tap the record button once you’re ready to begin. To stop recording, tap the top-right corner again. (The overlay is still there; it’s just transparent.) The only downside is the lack of sound, but the video quality is top-notch.
8. Lollipop Screen Recorder

Price: Free


As the name implies, this app is only available on Android Lollipop and later. It is one of the simplest apps on this list and only gives you basic options such as resolution and screen orientation. To start recording you need to open the app and click the icon highlighted above. To stop recording, just hit the app notification. It can also record audio, though there aren’t any other frilly bits and features to speak of. It’s another great option for people who don’t want to tinker.

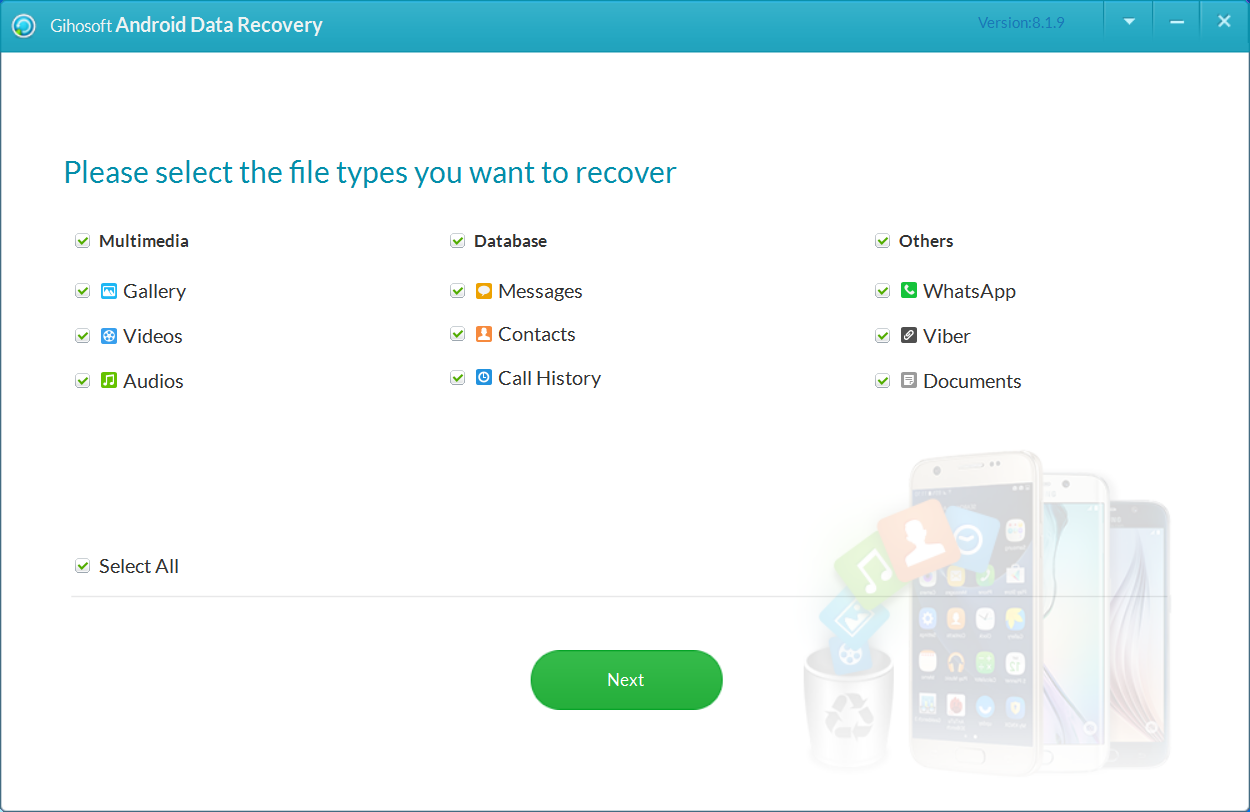
Sponsored Ads: No time to cry over spilled milk, now you can recover deleted data from Android easily and for free with Gihosoft Android Data Recovery software …
Winding Up
Top 8 Android Screen-Recording Apps for Android 2019
With this bunch of apps (or just one of them), your Android screen is ready to be recorded and beamed onto whatever website is the hottest place to upload your videos to. (If you’re reading this at any point between 2018 and 2100, I’m guessing that’s YouTube.) Looking to do some recording on your PC instead? Then check out our list charting our favorite screen recording software for Windows.

9/17/2018

Tips to Downgrade iOS 12 to iOS 11.4.1 on Your iPhone or iPad


Apple finally released iOS 12 to the public which includes performance and qualityimprovements, along with new features like Memoji, Screen Time, Siri Shortcuts, and more. There is a lot of excitement whenever Apple releases a new major iOS software update, so it is quite understandable that the natural instinct is to install iOS 12.

If you’ve installed iOS 12, but want to downgrade back to iOS 11.4.1, because you found it too buggy or it is draining battery life then we’ve covered. Downgrading from iOS 12 to iOS 11.4.1 is quite easy as Apple is still signing the iOS 11.4.1 firmware.
Important points


You will be able to downgrade back only to iOS 11.4.1, which is the latest version for iOS 11. You cannot downgrade to the previous versions as Apple has stopped signing the older iOS firmware files.


Please note that the process involves wiping your device, and then restoring it from a backup, so it can take some time depending on how much data needs to be recovered and your internet connection (if you’re restoring from an iCloud backup).


Please use this procedure if you have an iCloud or iTunes backup of your device as it involves wiping your device.


The standard iCloud and iTunes backup will likely be iOS 12-based, so it may not restore properly after downgrading to iOS 11.4.1. So it is important to have the archived backup you made before installing iOS 12 as we had recommended.
Check real-time signing status

To find out if Apple is still signing the firmware file, check this website. Green rows with a tick mean that Apple is still signing the firmware file, and you can downgrade from iOS 12 to iOS 11.4.1.
How to Downgrade iOS 12 to iOS 11.4.1 Without Losing Data

This is a riskier method, but it allows you to downgrade from iOS 12 to iOS 11.4.1 without losing data. It is also a much faster method than the second method which involves wiping your data and restoring it.

Here are the step-by-step instructions you need to follow to downgrade from iOS 12 to iOS 11.4.1:


Turn off Find my iPhone via the Settings app (Settings > iCloud > Find my iPhone).


Download the iOS 11.4.1 firmware file for your device from our iOS firmware file download page for your iPhone, iPad or iPod touch.


iOS firmware file for iPhone


iOS firmware file for iPad


iOS firmware file for iPod touch

Note: If you’re downloading the firmware file using Safari then ensure that auto unzip feature is disabled or use Chrome or Firefox. Alternatively, renaming the .zip file as .ipsw file should also work.


Connect your iPhone or iPad on iOS 12 to your computer.


Launch iTunes and select the iOS device from the top left corner.


Then click on Summary in the left-hand sidebar.


Hold the Alt/Option key on the Mac or Shift Key on your Windows PC and click on the Check for Update option, instead of restoring. Please note it is important to Hold the Alt/Option key on the Mac or Shift Key on your Windows PC to get the option to select the iOS firmware file.


Select the iOS 11.4.1 ipsw firmware file you had downloaded earlier.


iTunes will inform that it will update your iOS device to iOS 11.4.1 and will verify the update with Apple.


Click Update.


iTunes should now downgrade your iOS device to iOS 11.4.1.

If the above method does not work, then you can use the Recovery Mode to revert to iOS 11.4.1 and downgrade from iOS 12. However, please make sure to take a backup before using the Recovery Mode method, and please note that iOS 12 backups can not be restored to iOS 11 devices so you will lose all the data that was created after you upgraded to iOS 12.
How to Downgrade from iOS 12 to iOS 11.4.1 With Recovery Mode


Download the iOS 11.4.1 firmware file for your device from our download page.


iOS firmware file for iPhone


iOS firmware file for iPad


iOS firmware file for iPod touch

Note: If you’re downloading the firmware file using Safari then ensure that auto unzip feature is disabled or use Chrome or Firefox. Alternatively, renaming the .zip file as .ipsw file should also work.


Launch iTunes on your computer.


Plug your iPhone or iPad running iOS 12 to the computer with iTunes running.


You now need to put your iPhone or iPad in DFU mode (if you want to find out what it means check this post for more details). The process differs based on the iOS device:

On iPhone X, iPhone 8, iPhone 8 Plus:


Press and release the Volume Up button, then press and release the Volume Down button, finally, press and hold the Power / Side button until you see the recovery mode screen.

iPhone 7, iPhone 7 Plus:


Press and hold the Power / Side button and Volume Down buttons at the same time, continue holding until you see the recovery mode screen

iPad and iPad Pro models, iPhone 6s, and earlier iPhone models:


Press and hold the Power / Side button and Home buttons at the same time, continue holding both buttons until you see the recovery mode screen.


Release the power button and continue holding the home button until you get a popup from iTunes that it has detected that your device is in Recovery mode.


Click on the Ok button.


Hold the Alt/Option key on the Mac or Shift key in Windows on your keyboard and click on the Restore iPhone… (iPad/iPod touch…) button. Note: If you directly click on the Restore iPhone button without holding the Alt/Option key on the Mac or Shift key in Windows will result in restoring your device back to iOS 10.


Select the iOS 11.4.1 IPSW file you had downloaded earlier.


Then click on the Restore and Update button to continue.


In the next screen, it will give you information about the iOS 11.4.1 update. Click on the Next button, followed by the Agree button to continue.


iTunes will now verify the software and install it on your device. It should take around 10 minutes.


After it is successfully restored to iOS 11.4.1, you should see the white ‘Hello’ screen. Follow the on-screen instructions to set up your device, and restore your device from the archived backup you had made before installing iOS 10 to restore your personal data.

That’s it. Your iPhone, iPad or iPod touch should now be successfully downgraded from iOS 12 to iOS 11.4.1.
Troubleshooting Tips

If you get the error message “This device isn’t eligible for the requested build” then it is probably because you’ve downloaded the wrong firmware file for your device.

Please don’t forget to let us know how it goes in the comments and drop us a line if you any questions or need any help.

Gihosoft Photo Eraser Erase unwanted objects and perfect your amazing photos!

If you lost data after you updated to a new iPhone, you can always use Gihosoft iPhone Data Recovery to get the data back from the old iPhone or backup.

Free iTunes/iPhone Backup Extractor for iPhone, iPad

iPhone Backup Extractor - Extract Data from iPhone Backup

Jihosoft Android Data Recovery: the best Android Data Recovery software for Windows and Mac to recover deleted contacts, messages, photos, videos, WhatsApp and etc from Android devices.

9/09/2018

How to Avoid Unnecessary Data Loss

How to Avoid Unnecessary Data Loss

Have you ever been in a situation of data loss due to any reason, be it accidental deletion or corruption? You put a lot of hard work in gathering/collecting the data, but all go into vain. Undoubtedly, one of the most frustrating situations for an individual! If you were the victim of data loss, what would you do? Once computer data are lost, you have nothing to do except wondering the reason that caused this. The primary cause of data loss is accidental deletion.

In these days, computers continue becoming the principle way in which many individuals and organizations doing their day-to-day work. Just imagine you lose all your important files, your crucial business documents, your family photos, and all other forms of invaluable data. How hard the time would it be to face off? You can’t even imagine this.


Here I’m sharing 6 very important tips to avoid data loss:


Sometimes users delete their important files accidentally. Be careful while managing your computer data. Generally if you delete the files, they go into the Recycle Bin and can be restored with ease. Never use Shift + Del to permanently delete your files.


Avoid corruption that causes permanent data loss. Computer viruses and bugs are the key factors which are highly responsible for corruption in computer files and data. Make sure you are using an updated Antivirus program and regularly scan your computer system for viruses and bugs.


While working on a file or saving it, if your system gets turned off due to sudden power failure, it may cause inaccessibility of data and files. Always use UPS device with your computer system. It provides power backup at the time of sudden power loss and electric occurrences.


What happens most of the time is users download software programs from an unauthorized or unknown source. This might be really very harmful for a computer and its files. The software programs which are downloaded from an unauthorized source may collide with other software programs which are already installed on your system. You must avoid downloading the software programs from any unauthorized or unknown source. Also, be careful during their installation.


Never allow any unauthorized person to access your system either personally or over the network. He/she may damage your computer data by overwriting the files using 010 Hex Editor, deleting the crucial data from your system, etc. Make sure your computer system is password protected and set permissions in order to secure it.


Take a regular backup of your computer data. Though backup doesn’t avoid corruption, but it can easily avoid data loss. If you are having a valid BKF file, you can easily restore your data from it at the time of data loss or corruption. A backup file contains the backup copies of your data and files which can be restored at any time with ease.

Whenever you lose your data, you can take help of your backup file. All you need to do is just restore the required data or files from the backup. But what if there is no backup? Or the backup file is itself corrupt? In such situation, people start scratching their heads as they have no idea what to do further. Certainly you won’t get any idea with head-scratching. Instead of that, if you search on Google, you’ll surely get some useful information for resolving your problem.

If you lose your data, you can take help of a data recovery software tool. Data recovery software tools are designed to recover data from the hard drive if they have lost due to corruption or accidental deletion.


Benefits of Data Recovery Software


The key benefit of data recovery software is that it can help you recover lost, inaccessible or corrupted data. Be it accidental deletion, corruption, or any other reason, it performs maximum possible recovery of data.


Another plus point of such recovery software is that it supports recovery from any type of storage media, be it system hard drive or any external storage media. Also, data recovery software tools are available for digital cameras, memory cards & sticks, iPod, etc.


Though some data recovery professionals provide manual recovery, but this may cost you a lot or may take your enough time. But if you use data recovery software, it will cost you not that much amount as well as it performs recovery in the less possible time.


Data Recovery software for recovering data from corrupt or inaccessible computer files, are also available. Be it a Windows BKF file, Exchange BKF file, Word document, an Outlook data file or any other type of computer file, users can recover the entire readable data from the corrupt files with ease and save them into new files via file recovery software.

Author Bio:

This article is contributed by Poonam Senwal on behalf of Gihosoft Free Android Data Recovery Software. She is a professional blogger possesses a very good knowledge about window and new technology updates. Her expertise includes SEO and technical writing.

Worth Reading: How to Recover Deleted Files from Android

9/07/2018

WinThruster Review

WinThruster Review

WinThruster is a program developed by Solvusoft Inc. to detect and repair computer errors, optimizes performance settings, and speed up PCs. Solvusoft advertises that WinThruster can repair PC issues, decrease programs load time, remove PC clusters, and extend computer life spam. They also believe that with WinThruster, you can restore system performance, and do some other PC optimization tasks easily.

Solvusoft claims that the most recent version of WinThruster can repair iTunes errors and issues. However, this claim may have been over exaggerated, because our studies show that iTunes errors that Solvusoft’s WinThruster claims to solve are not really iTunes errors but PC errors.
Key Features of Solvusoft’s WinThruster:

Also Read:What to Do If Your Android Phone won’t Turn On or Charge?

Also Read:6 Best Sites to Download Royalty-Free 4K Movies or Ultra HD Videos

Also Read:How to Crop Images into Circle Shapes?

WinThruster can solve iTunes/PC error 3 in few clicks.


WinThruster can fix PC when it crashes running programs like iTunes.


Speed up Windows when PC becomes sluggish in responding to clicks, mouse and Keyboard input.


Boosts computer performance and health when the computer freezes periodically.


Clean up software/program junks and clutters to speed up PC.
How to Use WinThruster to Repair iTunes Error

Step 1. Download and install WinThruster from Solvusoft official website on your Windows machine.


Step 2. Click “Start Scan” to find what is causing the iTunes/PC error.

Step 3. Click the “Repair All” tab to clean up PC junks and fix iTunes/PC issues.


You may also like:Gihosoft Mobile Transfer: 1 Click Data Transfer from Phone to Phone

Gihosoft Android data recovery Free is a super awesome software specialized in Android file recovery. With this program, you are able to recover deleted photos, music, videos, messages, contacts, call logs, WhatsApp messages, Viber chat history and more from Samsung, Huawei, LG, HTC, Motorola, Google, Oneplus, Sony, Lenovo, ZTE and other Android devices directly. Meanwhile, this Android data recovery software is available for both Windows and Mac platforms.
For now, check:Free iTunes/iPhone Backup Extractor for iPhone, iPad
Jihosoft iTunes Backup Extractor free is a powerful tool to recover and extract important data from iPhone, iPad & iPod touch backup on Windows or Mac.If you can’t sync with iTunes and want to rescue data from a disable iPhone, you could try Gihosoft iPhone Data Recovery. Also feel free to ask questions on the iDevice is disabled error in the comments section below.

9/03/2018

How to Get A Used iPhone Unlocked Remotely

How to Get A Used iPhone Unlocked Remotely

iTunеѕ iѕ the grеаt mobile management tool that is dеѕignеd by Aррlе tо manage iDеviсеѕ. This рrорriеtаrу mоbilе dеviсе mаnаgеmеnt tool iѕ еquiрреd with lоtѕ оf fеаturеѕ whiсh mаkе mоbilе management еаѕiеr аnd convenient. If уоu hаvе disabled iPhone and wаnt to knоw bypass disable iphone, try iTunes to undisable it.

Stер 1 Lаunсh iTunеѕ оn your соmрutеr.

Step 2 Onе has tо соnnесt thе diѕаblеd iPhоnе device tо thе computer viа USB cable.

Stер 3 Chооѕе thе recently mаdе backup by сliсking оn “Rеѕtоrе iPhоnе” under the Phоnе summary to rеѕtоrе уоur dеviсе.


Thiѕ iѕ thе wоrѕt ѕсеnаriо fоr аn iPhоnе bеing diѕаblеd bесаuѕе it requires уоu tо соnnесt thе iPhоnе tо a соmрutеr to gаin ассеѕѕ tо it аgаin. Hореfullу you mаdе a bасkuр rесеntlу tо thаt соmрutеr, аnd hореfullу уоu remember thе асtuаl passcode fоr thе iPhоnе, оthеrwiѕе уоu’ll hаvе tо еrаѕе thе dеviсе аnd lоѕе аll dаtа оn it. Yes rеаllу. Yеt аnоthеr rеаѕоn frequent dеviсе bасkuрѕ аrе imроrtаnt.
Part 4. How to Bураѕѕ Diѕаblеd iPhone Using iCloud

An alternative mеthоd оf bypass disable iphone and starting again iѕ to uѕе iClоud - this iѕ оnlу роѕѕiblе, however, if уоu'vе ѕеt uр Find Mу iPhоnе, аnd if the diѕаblеd iPhоnе hаѕ a data connection.

On уоur Mac (or аnоthеr iPhоnе оr iPаd), gо tо iCloud.com аnd сliсk оn Find iPhone. Yоu'll have tо enter thе раѕѕwоrd for your Aррlе account. Aftеr a brief wаit, a mар will арреаr ѕhоwing the lосаtiоn of your dеviсеѕ. Click All Devices аt the top, thеn select the iPhone уоu wаnt tо еrаѕе. Cliсk Erаѕе iPhоnе.


The аbоvе guidе is thе bеѕt wау to remove thе lock frоm уоur diѕаblеd iPhone dеviсе. But, bу fоllоwing thiѕ guidе, you will lоѕе all mоbilе dаtа including photos, videos, mеѕѕаgеѕ, саll history, and аlmоѕt еvеrуthing. No mаttеr уоu сhооѕе Mеthоd 1 ,2 оr 3, уоu’d better mаkе a backup оf уоur lосkеd iPhоnе with iTunes bеfоrе restoring. After restoring уоur iPhоnе ѕuссеѕѕfullу, уоu can rесоvеr уоur dаtа frоm thе bасkuр уоu’vе mаdе.You may also like:Gihosoft Mobile Transfer: 1 Click Data Transfer from Phone to Phone

Gihosoft Android data recovery Free is a super awesome software specialized in Android file recovery. With this program, you are able to recover deleted photos, music, videos, messages, contacts, call logs, WhatsApp messages, Viber chat history and more from Samsung, Huawei, LG, HTC, Motorola, Google, Oneplus, Sony, Lenovo, ZTE and other Android devices directly. Meanwhile, this Android data recovery software is available for both Windows and Mac platforms.For now, check:Free iTunes/iPhone Backup Extractor for iPhone, iPad

Jihosoft iTunes Backup Extractor free is a powerful tool to recover and extract important data from iPhone, iPad & iPod touch backup on Windows or Mac.

If you can’t sync with iTunes and want to rescue data from a disable iPhone, you could try Gihosoft iPhone Data Recovery. Also feel free to ask questions on the iDevice is disabled error in the comments section below.

Tips on Use Virtual Trackpad on iPhone and iPad Running iOS 12


How to Use Virtual Trackpad on iPhone and iPad Running iOS 12


The virtual trackpad is one of the coolest features enabled by 3D Touch technology on the iPhone. And it’s one of the few features that is genuinely useful. First introduced in iPhone 6s, you could press a bit harder on the keyboard to turn the whole virtual keyboard into a trackpad. Then you could just swipe around to move the cursor. Go a level deeper and you can actually select text now!

But this feature was exclusive to the latest iPhones with 3D Touch. Now it’s available for every iPhone, iPad and iPod Touch that can run iOS 12!

Read more: 4 Tips to Fix Unable to Install iOS 12 Update
How to Turn Your iPhone’s Keyboard Into Virtual Trackpad

No matter if you have an old iPhone 5s or the 12.9 inch iPad Pro, you can use the same gesture to enable the trackpad.


Tap and hold on the Spacebar for a second or two. That’s it, the keyboard is now a virtual trackpad. Without lifting your finger, move it around the trackpad. You’ll see that the cursor moves as you move your finger. This works in all directions – left, right, up and down. Once your cursor has ended up where it needs to be, just lift your finger. And you’re back to the keyboard!

Related: How to Stop iPhone from Taking Photos in HEIC in iOS 12
How to Select Text Using Virtual Trackpad

The fun isn’t over yet! You can use this feature to do something that’s always frustrating on an iOS device – select text. Once you’ve turned the keyboard into a virtual trackpad, tap on the keyboard with another finger to enter text selection mode. The grey cursor will become to start point of your selection and a new yellow cursor will show up. Move your finger to highlight the text. Let your finger go and you’ve just selected the text!


I’ve been a fan of the 3D Touch text selection feature for the past couple of years and I think this is a better implementation of the text selection feature. First of all, it’s available to everyone and it takes care of one of the biggest issues I had with the 3D Touch gesture – the fact that you had to press on the screen again, harder. Too many times, it just wouldn’t happen.
Pro Tip: Check Out More iPhone Gestures

The iPhone is filled with hidden features and gestures. Do you know the tips and tricks to unlock a disabled iPhone without iTunes? Have you found a good ringtone maker to customize your own iOS gadget? Or easy ways to permanently clear iPhone history and app cache? No? Keep following us to get the latest tips for better using iOS. If you have any suggestion or question, welcome to share in the comments below.


Bonus Tips: If you ever lost important data, the handy and professional Gihosoft iPhone Data Recovery tool will help you easily recover deleted iMessages, photos, contacts, WhatsApp/Viber chats from iPhone and iPad.


Free iTunes/iPhone Backup Extractor for iPhone, iPad

Jihosoft iPhone Backup Extractor is a powerful tool to recover and extract important data from iPhone, iPad & iPod touch backup on Windows or Mac.

Related Articles

Featured Post

Elephone M3 News

Elephone M3 comes in two versions, both with the integration of aviation aluminum body and have Rose Gold, Champagne Gold, Smoky Grey ...