9/17/2019

TENAA Filings Reveal iPhone 11 and iPhone 11 Pro Battery Capacities, Confirm 4GB RAM


It turns out, the previously detailed battery and RAM capacities of the iPhone 11 and iPhone 11 Pro models were incorrect. Now that the phones have passed through TENAA — a Chinese regulatory body, these details have now been made available.

The iPhone 11 Pro and the iPhone 11 boast of major battery life improvements over the iPhone XS and iPhone XR from last year. While Apple has used a more power-efficient display and chip inside these phones, the jump in battery life is also due to the use of bigger batteries. It was rumored that Apple was adding bigger batteries to its iPhone 11 lineup for reverse wireless charging. While the feature did not ship due to efficiency reasons, the bigger battery means the new iPhones deliver great battery life.

Below is a rundown of the battery capacities on the iPhone 11 and iPhone 11 Pro:


iPhone 11 – 3,110mAh


iPhone 11 Pro – 3,046mAh


iPhone 11 Pro Max – 3,969mAh

The iPhone 11 ships with 3110mAh battery. For comparison, the iPhone XS, which the iPhone 11 replaces, features a 2942mAh battery.


The iPhone 11 Pro ships with a massive 3,046mAh battery — a sizeable jump from the 2658mAh battery inside the iPhone XS. No wonder then that the handset is able to last four hours longer than its predecessor. A jump of around 450mAh is no small deal.

The iPhone 11 Pro Max ships with the biggest battery found inside an iPhone till date at 3,969mAh. That’s again a sizeable jump from the 3174mAh found inside the iPhone XS Max. At almost 4,000mAh, the battery capacity of the iPhone 11 Pro rivals some of Android flagships out there like the Galaxy S10, OnePlus 7 Pro, etc.Also Read:15 Exhentai proxy sites

Also Read:4K Video Downloader


All three phones also ship with 4GB RAM. While the iPhone XS series also features 4GB RAM, the iPhone 11 only shipped with 3GB RAM. A previous report had inaccurately predicted that the iPhone 11 Pro series shipped with 6GB RAM but that’s not the case.

Apple bundles an 18W USB-C fast charger with the iPhone 11 Pro series which will ensure that the phones are able to charge from 0-50% in just 30 minutes. As for the iPhone 11, it continues to ship with a 5W charger so charging it from 0-100% is easily going to take upwards of 2.5 hours.

[Via MacRumors]

9/01/2019

How to Share Audio to Multiple AirPods from iPhone


Apple has made it easier to share audio from one device to AirPods. If you and your friend both have a pair of AirPods, you can both listen to the same audio from the iPhone quite seamlessly. Audio Sharing is a new feature in iOS 13 and this is how it works.

If you’ve got two AirPods, sharing audio this way is much more elegant and seamless compared to the old ways of using a splitter or just handing one AirPod to another friend. This process also works with Powerbeats Pro.
Share Audio to Multiple AirPods from iPhone Running iOS 13

If both you and your friend are running iOS 13 on your respective iPhones, and both of you have AirPods paired with your iPhones, all you really need to do is put the two devices near each other while one iPhone is playing audio from an app. You can put one iPhone on top of another to make the process simpler.

The following devices support this feature (devices with Bluetooth 5.0):


iOS 13: iPhone 8, iPhone 8 Plus, iPhone X, iPhone XR, iPhone XS, iPhone XS Max; or an iPod Touch (seventh-generation).


iPadOS 13: iPad Pro 11-inch; iPad Pro 12.9-inch (second-generation or later); iPad Air (third-generation); iPad mini (fifth-generation).


When you put the iPhones next to each other, you’ll get a prompt asking if you want to share audio with the other device. Just tap on “Share Audio” button to start sharing.
How to Share Audio Directly to AirPods from iPhone

What if the other person doesn’t have their iPhone but does have a pair of AirPods. You can still use this feature to manually pair the second pair of AirPods.

And it’s exactly the same as the normal AirPods pairing process.

Open the AirPods case near the iPhone and press and hold on the button at the back of the AirPods case. Tap on Connect when the pairing popup shows up.

Once connected, two AirPods will show up in the AirPlay menu. So start playing the media, tap on the AirPlay button and then from the outputs screen, select both AirPods. The audio will now play on both devices.
More iOS 13 How-tos

We’re working on bringing you more detailed guides for how to use the new and awesome features in iOS 13. Once you’ve read our iOS 13 tips and tricks article, read our how-tos below.

Tips:

In fact, you might even create some of those videos yourself. But what about going live so that your followers can see you in real-time? After all, Instagram, Twitter, and Facebook are all social media platforms that allow you to “Go Live”, so what about TikTok? How To Go Live & Stream on TikTok

8/26/2019

Patent Infringement Lawsuit against TSMC Seeks Ban on iPhone Import in the U.S, Germany


Apple has been named in yet another patent infringement case. This time around Global Foundries has filed a lawsuit against TSMC, the company that makes Apple’s A-Serieschips. The company wants to half import of such processors and is seeking “significant damages from TSMC based on TSMC’s unlawful use of GF’s proprietary technology in its tens of billions of dollars of sales.”

Global Foundries intends to stop the import of chipsets that are covered by its patents. Apparently TSMC doesn’t directly import the chips to the U.S, however, its customers do. It is also worth noting that the scope of the lawsuit is very vast. Companies like AMD, Nvidia, Apple, MediaTek, and many other companies are likely to be affected. In fact, Apple has been named in three out of 16 cases of infringement.

GLOBALFOUNDRIES (GF), the world’s leading specialty foundry based in the United States, today filed multiple lawsuits in the U.S. and Germany alleging that semiconductor manufacturing technologies used by Taiwan Semiconductor Manufacturing Company Ltd. (TSMC) infringe 16 GF patents. The lawsuits were filed today in the U.S. International Trade Commission (ITC), the U.S. Federal District Courts in the Districts of Delaware and the Western District of Texas, and the Regional Courts of Dusseldorf and Mannheim in Germany.

In filing the lawsuits, GF seeks orders that will prevent semiconductors produced with the infringing technology by Taiwan-based TSMC, the dominant semiconductor manufacturer, from being imported into the U.S. and Germany. These lawsuits require GF to name certain major customers of TSMC and downstream electronics companies, who, in most cases, are the actual importers of the products that incorporate the infringing TSMC technology. GF also seeks significant damages from TSMC based on TSMC’s unlawful use of GF’s proprietary technology in its tens of billions of dollars of sales.”

TSMC and the others named as co-defendants are yet to issue an official reply. Apart from TSMC, the list also includes Apple, Broadcom, Qualcomm, Xilinx, Lenovo, Motorola, ASUS, BLU, Cisco, and OnePlus. At this point in time, we are unsure of how the import ban will affect iPhone production in the U.S and Germany.If you lost data after you updated to a new iPhone, you can always use Gihosoft iPhone Data Recovery to get the data back from the old iPhone or backup.You may also like: iphonerecovery.com


[via GlobalNewsWire]

8/11/2019

iOS 13: All the New CarPlay Features


While it might not seem like it, CarPlay in iOS 13 is a huge leap forward when it comes to the user experience. The Dark mode now matches iOS 13’s UI, there’s a new Light mode to boot and the new Dashboard gives you control of Maps and Music all in one screen. Plus, screen independence is finally here. Here are all the new CarPlay features for iPhone in iOS 13 you should know about.
CarPlay in iOS 13: All The New Features
1. New Dashboard Design


The changes are apparent the minute you connect your iPhone to your car. When CarPlay starts up, you’ll now see a Dashboard UI. And it will be in the new dark mode. The Dashboard view shows Maps on one side and three different widgets on the other.

The first widget is for Apple Maps. You’ll see shortcuts to your frequent locations here. When you’re navigating, you’ll see directions here. The middle widget is for Now Playing. You’ll see the album art for the currently playing media and buttons for Play/Pause and skip. You can tap on it to open the Now Playing app.

The last widget is for Siri Suggestions. This will depend heavily on your usage. You’ll find suggestions for launching apps, initiating Siri Shortcuts and more here. In the sidebar, you’ll find the three recently used apps.
2. How to Switch to The Old Icons View


In the Dashboard view, the old Home button is gone. It is now replaced by a new icon that depicts the current Home screen view. You can tap on it to switch back to the old Icons view. Weirdly enough, the button still behaves like the Home button when you’re in an app. Tap on it to go back to the Home. Tap on it again to change the Home screen view.

You can also swipe left/right on the Dashboard to switch to the old view.
3. New Management Screen on iPhone in Settings


If you go to Settings -> General -> CarPlay, you’ll find a new Customize option. Previously, you had a virtual screen for CarPlay view that you would tap to change the app orders or to remove them. Now, when you tap on Customize, you’ll see a list of all available apps. Tap on the “-” (minus) icon to remove an app from CarPlay. To rearrange an app, tap and drag the handlebar icon.
4. Updated Settings


The Settings screen in CarPlay has also been updated.

Do Not Disturb While Driving: You can now set up this feature right from CarPlay. It can be set up to automatically engage Do Not Disturb While Driving mode when you connect to CarPlay.

Automatic Dark Mode: Tap on the Appearance button and you’ll be able to switch between Automatic and Always Dark option. The Automatic option will switch between the new Light and Dark mode based on the time of the day and the ambient light in your car or your environment.

But this doesn’t always work reliably. It’s best to use the Always Dark option. The new Dark Mode theme in iOS 13 makes good use of muted colors and solid backgrounds. It’s much better on the eyes. The new Light mode can in fact be a bit too bright unless you’re in a very sunny area.

Turn off Siri Suggestions: You’ll also find the toggle to turn off Siri Suggestions here. Tap on it and the widget in the Dashboard that shows Siri Suggestions will go away.

Show Album Art: Tap on the toggle to enable/disable the Album Art for the Now Playing widget in the Dashboard.
5. New Light Mode


iOS 13 and iPadOS 13 get a new dark mode. And CarPlay gets a new Light mode.
6. New Siri View Over The Screen


Siri no longer takes over the whole screen when you engage it. It now shows a slightly translucent layer on top of what you’re seeing. It works really well and we hope this feature comes to iPhone and iPad soon.
7. Screen Independence

CarPlay for iPhone finally has screen independence. Previously if your passenger took your iPhone and opened an app that wasn’t available on CarPlay, it would throw you directly to the icons home screen. This would disrupt your navigation view. Now, in iOS 13, CarPlay has screen independence. So this no longer happens.

You can open and use any app on the iPhone without affecting what’s on the iPhone’s screen. Now, a friend can take your iPhone and browse through songs on the Music app when you keep navigating on the CarPlay using Maps or any other app.
8. New Calendar App


CarPlay in iOS 13 has added a new app – Calendar. It’s a very simplified app. All you can see is the day’s events. That is all.
9. New Maps UI


Just like iOS 13, the Maps app in CarPlay sees a big upgrade. All the new features from Maps app are here. When you open the Maps app, you’ll see shortcuts to your Favorite locations at the top. You can even browse through your Collections here.


You can search for locations, or go to a previous destination. Tap on a location to open the detailed view. From here, you can choose a different route, and start the navigation.


During navigation, you’ll see a new option called Share ETA. You can quickly share your ETA with a contact in Messages. You can continue monitoring your ETA after this as well.
10. New Messages View


The Messages app now opens to a list of your recent conversations. Once you tap on a conversation, Siri will start reading the latest message for you. Then you can reply to it using your voice. That part hasn’t changed.
11. Hey Siri and Always on Siri

Another big change in CarPlay? Hey Siri now works directly on the CarPlay UI. Plus, there’s support for Always On Siri. This is a change in the behavior of Siri. Previously, you’d have to wait for a second or two after hitting the Mic button on your car steering to call up Siri. Now, you can start talking as soon as you hit the button because Siri is always on in the background.

It will pick up your command as soon as you hit the button. This reduced the lag and the frustration of using Siri via your car interface.If you lost data after you updated to a new iPhone, you can always use Gihosoft iPhone Data Recovery to get the data back from the old iPhone or backup.You may also like: iphonerecovery.com


7/17/2019

How to Get The Viral Old Age Filter Using FaceApp


After Snapchat’s baby filter, it’s FaceApp’s old age filter that has gone viral. Celebrities and mere mortals alike are posting what they’ll look like in old age. We’ve seen these apps before but what sets FaceApp apart is just how good and photorealistic these filters are. If you’re intrigued by it and you want to try it out for yourself, follow the steps below.
What Is FaceApp’s Old Age Filter?

FaceApp is a popular app for applying face filters and for editing selfies. Their recent addition of the old face filter is what made it go viral again. This filter takes any photo (either by clicking a selfie, uploading from your Camera Roll, or any image from the web), and applies an old age filter to it. This basically means that it will grey out your hair, add wrinkles to your skin and so on. What it does is quite simple, but the way it does it is extraordinary.
How Is Old Age Filter Being Used Online?

As the old age filter went viral, it has been used by everyone from online personalities, influencers, celebrities to fan communities. Because the FaceApp makes it easy to search for any image online and apply a filter to it, a lot of people have posted old age filters for their favorite celebrities. If you visit your Facebook feed, you’ll also see people doing this for their friends.


Patrick Tomasso

@imPatrickT

#YouTube in 50 years.


18.5K

4:56 AM - Jul 17, 2019

Twitter Ads info and privacy

3,188 people are talking about this

FaceApp filters have been applied to everyone from YouTube celebrities to Harry Potter cast and everyone in between.


Medardas Kerbelis

@MedardasKerbel1

Old age filter! #FaceApp #oldagefilter #oldfilter #oldme #grandpa #Lithuania


3

4:03 AM - Jul 17, 2019

Twitter Ads info and privacy

See Medardas Kerbelis's other Tweets
How to Use Old Age Filter in FaceApp

Step 1: Download the FaceApp app from the App Store.

Step 2: Open the app and give the app access to the camera and the photo library.

Step 3: Tap on the Camera icon to click a selfie. Then tap on the Use button.

Step 4: The app will process the photo and it will take a while.

Step 5: Alternatively, you can browse around in your library to find any photo, and then tap on it to select the photo from the old age treatment.

Step 6: Once the photo is processed, you’ll see many different filter options, with smileys, impressions, age and more. Here, tap on the Age button.

Step 7: Next, select Old from the options and then tap on Apply.

Your old age photo will now be generated. You can tap on the Layout button to create a comparison between the original and the filtered image.

Download: FaceApp (Free)
How to Use Old Age Filter On Other Photos


ᴺᴼᵀ Jony Ive

@JonyIveParody

The greatest old man… #OneMoreThing


669

7:02 AM - Jul 17, 2019

Twitter Ads info and privacy

87 people are talking about this

You can create an old age filter photo for any photo from the web. When you open the FaceApp, swipe on the sources at the bottom of the page and select Celebrities. Here, you can search for anyone on the web, choose a photo from Google Images and apply the face filter.
Share Your Best Creations

What are some of the best old age filters that you’ve created? Share with us in the comments below.

Sponsor ads:

Gihosoft RePicvid Free Photo Recovery Software provides a free photo recovery software for windows to help users recover the deleted or lost photo for free.

If you lost data after you updated to a new iPhone, you can always use Gihosoft iPhone Data Recovery to get the data back from the old iPhone or backup.You may also like: iphonerecovery.com

7/15/2019

iOS 13 Security Flaw Allows Unauthorised Access to Passwords Stored by Autofill Feature


A bug has been discovered in iOS 13 beta which provides one with unauthorized access to all passwords, emails, and usernames stored by the Autofill feature. iOS 13 is still in beta stages so thankfully this bug is only going affect a limited number of people who are running the public or developer beta.

The bug provides one with access to all the passwords and data stored in the iCloud keychain and used by the Autofill feature in iOS. Simply go to Settings -> Passwords & Accounts and start tapping the Website and App Passwords option repeatedly.

Doing so will cancel the Face ID/Touch ID prompt on the display after a few tries and give one access to all the stored passwords and usernames. One can even modify the stored passwords if they wish to.

This bug does require that the iPhone/iPad is already unlocked which is not going to be as easy.

Since this bug has now been detailed, Apple will likely fix the issue with the next beta release of iOS 13 and iPadOS 13.

iOS 13 comes with a number of new privacy-oriented features and enhancements. While this bug is definitely serious, one must remember that the OS itself is in beta stages of development and testing and such bugs are bound to be there. Nonetheless, Apple should fix this bug with the next beta release of iOS 13 due to drop later this week.Sponsor ads:

Gihosoft RePicvid Free Photo Recovery Software provides a free photo recovery software for windows to help users recover the deleted or lost photo for free.

If you lost data after you updated to a new iPhone, you can always use Gihosoft iPhone Data Recovery to get the data back from the old iPhone or backup.You may also like: iphonerecovery.com


7/03/2019

Download iOS 13 and iPadOS 13 Beta 3 [Update: Public Beta Out]


Apple today released the third developer beta of iOS 13 and iPadOS 13.

Update: iOS 13 beta 3 is not available for iPhone 7 and iPhone 7 Plus.

The update will be available as OTA for all developers running beta 2 of iOS 13 or iPadOS 13 on their iPhone or iPad.

Additionally, the company has also released the third developer beta of macOS Catalina.

The latest developer beta from Apple should contain a number of bug fixes and stability improvements. There are also going to be some minor changes and tweaks and we will report about them as they are discovered.

With the third developer beta released, it is likely that we will see Apple release the second public beta of these operating systems for public beta testers later this week as well.

The final release of iOS 13 and iPadOS 13 are expected to drop in September around a week before the 2019 íPhones launch.
Download iOS 13 and iPadOS 13 Beta 3

If you are already running iOS 13 Developer Beta 2 on your iPhone, you just need to go to Settings -> General -> Software Update and download the beta 3 OTA.

The same steps are also applicable for downloading iPadOS 13 Beta 3.

Read: Install iOS 13 or iPadOS 13 Public Beta on iPhone and iPad
iOS 13 Features

1. Dark Mode

The biggest feature of iOS 13 is the new Dark Mode. This is truly system-wide. It stretches from the Lock screen to the widgets screen to Apple’s own apps. Even the keyboard gets a better version of the dark mode.Dark mode can be enabled easily from the Control Center.Lectura de contenido relacionado:Corrige 0x0 0x0 Error

Leer másG2a sitio


2. 30% Faster Face ID Unlock

Something that will be noticeable instantly for iPhone X and above is that Face ID unlocked more than 30% faster.

3. Faster App Loading

Apple is continuing the focus on performance from iOS 12. The apps now launch twice as fast. And app downloads will be 50% smaller while app updates will be over 60% smaller.

4. Redesigned Volume HUD

The new Volume HUD appears in the top-left corner of the screen in an unintrusive manner. It first shows up as a full sized slide. But it immediately shrinks and becomes unintrusive.

5. iCloud Drive Folder Sharing in Files App

You can now share a whole iCloud Drive folder with other users using the Files app.


If you notice any major changes or improvements in iOS 13 or iPadOS 13, drop a comment and let us know about it.

Sponsor ads:

Gihosoft RePicvid Free Photo Recovery Software provides a free photo recovery software for windows to help users recover the deleted or lost photo for free.

If you lost data after you updated to a new iPhone, you can always use Gihosoft iPhone Data Recovery to get the data back from the old iPhone or backup.You may also like: iphonerecovery.com

iOS 13 Beta 3 Hints at New Wired Method for Transferring Data Between Old and New iPhone


A new graphical asset discovered in iOS 13 beta 3 points to Apple working on a new feature that will allow users to set up a new iPhone and transfer data from an old device over a wired connection.

The setup app currently allows one to set up their iPhone and import data from their old one over Wi-Fi, iTunes, or from their iCloud account. The new asset found in iOS 13 beta 3 points to Apple adding a new method to the setup app in which the transfer process works over a wired connection.

Android devices already offer the ability to import data from older Android smartphones and iPhones over a wired connection. Compared to using Wi-Fi, using a wired connection is reliable and faster, especially when one’s old device has a lot of data. However, one must have access to the right type of wire as well.

View image on Twitter


Filipe Espósito

@filipekids

I’m curious about that asset found on iOS 13… it’s used (or at least should be) on the setup process. A faster way to transfer data from a device to other without iTunes or iCloud? I didn’t restored my iPhone to install iOS 13, so I don't know if this is already in use.

144

8:30 AM - Jul 3, 2019

37 people are talking about this

Twitter Ads info and privacy

Having such a feature in iOS 13 would make a lot of sense if Apple plans on switching to USB-C and dump the Lightning connector on its 2019 iPhones. This is because while USB-C to Lightning cables are available in the market, there is no such protocol in which you get a wire with Lightning connectors at both ends.

Perhaps this feature hints at Apple ditching the Lightning connector on its 2019 iPhone 11 lineup and switching to USB-C. Or perhaps the company will launch a Lightning-to-Lightning wire alongside its 2019 iPhones later this year. What do you think?

Sponsor ads:

Gihosoft RePicvid Free Photo Recovery Software provides a free photo recovery software for windows to help users recover the deleted or lost photo for free.

If you lost data after you updated to a new iPhone, you can always use Gihosoft iPhone Data Recovery to get the data back from the old iPhone or backup.You may also like: iphonerecovery.com

6/17/2019

How to Install iPadOS 13 Beta 2 on iPad Using Beta Profile


Apart from releasing the beta profile of iOS 13, Apple also released the beta profile of iPadOS. This means advanced users and developers can install iPadOS 13 on their compatible iPad running iOS 12 without having to download the entire IPSW file.

iPadOS is a massive upgrade and greatly improves the multitasking experience on the device. Since it is in beta stages, Apple did not release the beta profile earlier this month when it dropped the first beta. It wanted to deter advanced users and testers from installing an unfinished and buggy build of iPadOS on their device and instead recommended them to wait for the public beta next month.

Now that Apple has released the beta profile of iPadOS 13 with the second developer beta, it is extremely easy to install iPadOS on one’s iPad. The entire process will barely take a few minutes and does not even require access to the Internet.
How to Install iPadOS 13 Beta 2 on iPad Using Beta Profile

Make sure to create a backup of your iPad/iPad Pro running iOS 12 before proceeding with the steps below.

Step 1: Open this link on your iPad in Safari. You will be automatically redirected to ‘iOS Beta Software Profile’ after the download is complete.

Step 2: Tap on Install three times before selecting the Reboot option.

Step 3: After your iPad is done rebooting, head over to Settings -> General -> Software update. The iPadOS 13 developer beta 2 OTA update should show up for download for your iPad/iPad Pro. If not, wait for a few minutes and try again. If that still does not work, make sure to restart your iPad again.

If you can, I will strongly recommend you to wait until the public beta release of iPadOS next month. That build is bound to be more stable and should have fewer bugs and will offer a better experience overall. While the second developer beta of iPadOS 13 will have fewer bugs than the original beta build, it will still offer a very rough experience around the edges.

Sponsor ads:

Gihosoft RePicvid Free Photo Recovery Software provides a free photo recovery software for windows to help users recover the deleted or lost photo for free.

If you lost data after you updated to a new iPhone, you can always use Gihosoft iPhone Data Recovery to get the data back from the old iPhone or backup.You may also like: iphonerecovery.com

iPhone Manager:Get the ultimate Gihosoft iPhone Manager. Free download for PC/Mac.

6/09/2019

How to Bypass FRP on Samsung Galaxy S8 without PC (May Not Work)


How to Bypass FRP on Samsung Galaxy S8 without PC (May Not Work)

As you know, FRP was a Google creation for its Android OS for protection purpose. Some sites claim that the steps below can be used to bypass FRP on Samsung S8 successfully. But when I try, I found it difficult to figure it out and the lock was not fixed finally. If you would like to try, just follow:

Step 1: Open your Samsung S8 and try to set it up. Make sure you connect your Samsung S8 to a Wi-Fi network.

Step 2: Go back to the Samsung welcome page, open TalkBack with 2 fingers.

Step 3: Select EMERGENCY CALL at the bottom.

Step 4: Call 112. Quickly double click on the “+” icon.

Step 5: Press the Power and Volume Up button at the same time to turn off TalkBack.

Step 6: Tap Add to contacts from the list menu.

Step 7: Create a new contact and save it.


Step 8: Then go to the contacts list to click the contact you added.

Step 9: Click to send a new message. In the message field, type www.youtube.com and send it.


Step 10: Simply tap the message and it will open the Youtube app.

Step 11: Click the link in the description and it will open the Google Chrome app.

Step 12: Open the page: https://frpbypass.net/download-frp-tools-free-bypass-frp-apk-pc-tools/ and download the Apex Launcher.

Chuwiには、カスタマイズされたラップトップ、タブレットPC、妥協のない品質、安定性、サポート、パフォーマンスを備えたミニノート pcエクスペリエンスの世界有数のテクノロジーパートナーになることをミッションがあります。Lectura de contenido relacionado:Corrige 0x0 0x0 Error

Leer másG2a sitio


Step 13: On Google Chrome, go to Bookmarks > History > Download History and install the Apex Launcher on your device. Open the apk when it has installed.

Step 14: Go to Settings > Lock screen security > Other security settings device > Administration on your device.

Step 15. Turn the “Find My Device” off.

Step 16: Then go back to Settings and click on Apps.

Step 17: Tab on the 3 dots and select Show system apps.

Step 18: Go to Google Account Manager > Storage > Clear Data and disable it.

Step 19: Go to Google Play Services > Storage > Manage Storage > Delete All Data and disable it.

Step 20: Now, you can download and install the bypass FRP apk on your device.

Step 21: Go to Settings > Cloud & accounts > Add account > Google.

Step 22: Sign in with your Gmail account and confirm it.

Step 23: Then go to Settings > Apps > Disabled > Enable Google Play Services.

Step 24: Finally, restart your Samsung Galaxy S8 and activate the FRP bypass.
Cons of This Method:


It’s a long and somehow complicated process of bypassing Samsung FRP lock. This is the major reason that stops most users using this method.


This method doesn’t work for all Samsung devices. It’s just for some specific models.

Also Read:15 Game Torrenting Sites to Download Games in 2019

Also Read:5 Best Free Backup Software for Windows

Also Read:KissAsian to Watch Asian Movies

Also Read:5 Best Websites Like Afdah for You to Stream Movies in 2019

Hotstar, India’s Most Popular Streaming Service Drops Support for Safari


Hotstar, one of the most popular streaming services in India, has disabled support for Safari after it discovered a security flaw that allowed unauthorized use of its platform and gave one access to its premium content catalog. Hotstar initially blamed dropping support for Safari as “technical limitations” on the browser’s part.

A report from TechCrunch, however, paints a different story. Safari support for Hotstar was pulled after engineers at the company discovered a flaw that was being used for unauthorized access to the streaming service platform and its premium content. The flaw could be exploited through both Safari on the desktop and on iOS devices.

Sources at Hotstar told TechCrunch that this was not an accurate description of the event. Instead, company’s engineers had identified a security hole that was being exploited by unauthorized users to access and distribute Hotstar’s content — including the premium catalog.

Chuwiには、カスタマイズされたラップトップ、タブレットPC、妥協のない品質、安定性、サポート、パフォーマンスを備えたミニノート pcエクスペリエンスの世界有数のテクノロジーパートナーになることをミッションがあります。


Hotstar engineers are working on fixing the flaw and supporting Safari once again.

The exploit has been discovered by the Hotstar’s engineering team just as the ICC World Cup 2019 began. With Hotstar the official streaming partner of the event in India, millions of viewers are going to take tune into the streaming platform to watch the action. During the IPL 2019 finale, over 18.6 million concurrent viewers tuned into Hotstar’s live stream — a world record for any OTT service across the world.

[Via TechCrunch]

Sponsor ads:

Gihosoft RePicvid Free Photo Recovery Software provides a free photo recovery software for windows to help users recover the deleted or lost photo for free.

If you lost data after you updated to a new iPhone, you can always use Gihosoft iPhone Data Recovery to get the data back from the old iPhone or backup.You may also like: iphonerecovery.com

If you use android phones, please choose Gihosoft Android Data Recovery.With Gihosoft Android Data Recovery, no longer afraid of data loss!

iPhone Manager:Get the ultimate Gihosoft iPhone Manager. Free download for PC/Mac.

5/27/2019

iOS 12.3.1 Improves Battery Life of Older iPhones


Late last week, Apple released the bug-fixing iOS 12.3.1 update. It was primarily aimed at fixing some VoLTE and Messages related bugs that made their way into the OS with the iOS 12.3 update. However, it looks like iOS 12.3.1 also brings about a small improvement in battery life on older iPhones.

As testing from YouTuber iAppleBytes shows, the battery life of older iPhones like the iPhone 5s, iPhone 6, and iPhone 7 seems to have improved after the iOS 12.3.1 update.

A difference of a few minutes in Geekbench’s battery life benchmark is well within the error of margin which is what happens with the likes of the iPhone 6s and iPhone 8. Their battery runtime score remained almost the same before and after the iOS 12.3.1 update. However, the likes of iPhone 5s, iPhone 6, and iPhone 7 saw a noticeable improvement of around 15 minutes which points to Apple making some underlying changes or fixing some bugs which have led to this improvement.


While running iOS 12.3, the iPhone 5s, iPhone 6, and iPhone 7 lasted 2 hours 35 minutes, 2 hours 34 minutes, and 2 hours 58 minutes, respectively in the Geekbench battery test. After the iOS 12.3.1 update, the iPhone 5s lasted 14 minutes longer for a total time of 2 hours and 49 minutes. The iPhone 6 saw a decent bump in its battery life and lasted 18 minutes longer — from 2 hours 34 minutes to 2 hours 52 minutes. As for the iPhone 7, its battery life increased by 18 minutes as well.
Our Take

It is a small improvement for sure but one that would be appreciated by older iPhone users. It also shows that Apple has continued to stick to its promise of delivering on stability and performance with not just the initial iOS 12 release but subsequent updates to it as well.

Have you noticed any improvement in battery life on your iPhone after the iOS 12.3.1 update? Drop a comment and let us know!

Also Read:Convert Picture to Watercolor Painting on Android?

Also Read:23 Best Vidics Alternatives for You to Watch movies/TV serials in 2019

Also Read:Fix “The program can’t start because api-ms-win-crt-runtime-l1-1-0.dll is missing”

Also Read:11 Best iPad Interior Design Apps to Decorate Your Home in 2019

Also Read:8 Best To-do List Apps on Mac to Easily Manage Your Tasks in 2019

Also Read:Best Free 4K UHD Video Player Software for Mac/Windows 10 in 2019

Also Read:iPhone Music Player Alternatives to Apple Music App in 2019

5/21/2019

Best productivity apps for Android: manage your life like a pro

Best productivity apps for Android: manage your life like a pro

smartphones and tablets can be a great way to kill time and socialize, but who knew that they can also boost your productivity? As long as you know the right apps that can lend a hand, your life could become a lot easier. Here is our list of the best productivity apps.

1. Tiny Scanner - PDF Scanner

If your work requires a lot of document scanning, you should be armed with Tiny Scanner, which allows you to create PDFs from any documents using just your smartphone camera.

Take a snap, crop it, and select a PDF page size (like 8.5" x 11", or A4), then hit the tick button. It's that simple. Tiny Scanner will produce a black and white scan of a document that looks as good as if it came out of a scanner.

It has a few neat tools, like automatically straightening your scans if they're a bit wonky, but you'll need a decent(ish) camera for best results. Colorful PDFs tend not to look as strong, but it's an effective replacement for a home scanner, and color is an option if you want it.

While it used to offer pretty much everything for free, there's now a Pro version that you'll need to pay for if you want to do things like upload your scans straight to cloud storage services.


Best scanning apps for Android

Tiny Scanner is a suitable replacement to PC scanners of old. / © AndroidPIT

Tiny Scanner - PDF Scanner App
2. LastPass Password Manager

It's a pain to keep track of all your login credentials for the different websites and services that you use, and even worse when you actually forget them and lose access to critical information. That's why a password manager is essential for the high-functioning user.

LastPass is one such service, which saves all of your passwords and other sensitive credentials in one place. As well as remembering all your passwords, the app can log you in to websites and apps automatically, and generate strong passwords for you on the fly. This works via the in-app browser but also via Safari and Chrome.

The free version of the app should cover most of your needs, and even includes cross-device syncing of your credentials and vault, but there's also a premium subscription model with additional features for power users.


3 tips for securing your Android device

LastPass Password Manager
3. Evernote

Many of us rely more and more for our smartphone to do our short and long-term planning, scheduling and reminders, so having an app that does these things is critical. Evernote has a lot of those functions that make it an essential app for productivity. Evernote is for more than just note-taking, you can also schedule appointments, set reminders, take notes, and so much more.

Though Evernote does offer a ton of different organizing options, it remains very easy to navigate. There are other note taking and scheduling apps out there but none do it with the balance and functionality of Evernote.

Evernote has so many functions that are crucial to our daily lives. / © ANDROIDPIT

Evernote – Take Notes, Plan, Organize
4. Pushbullet

Pushbullet is an incredibly useful app if you spend most of your day sat at a computer and frequently find yourself switching between different devices. It started out as a way to send individual files between those different devices - mobile and desktop, as well as mobile-to-mobile). Now, you can move files, respond to notifications, SMS, and other messages directly from your desktop.

It supports end-to-end encryption, and remote file browsing across connected devices, providing that you enable that feature.

Pushbullet used to be one of my favorite apps in any category, just for its sheer handiness - but then the company started charging for some of its most useful features. Eventually, I gave in and paid the annual subscription, but you can use it for free if you don't mind limited file sizes for sending and don't need to respond to notifications from the desktop.

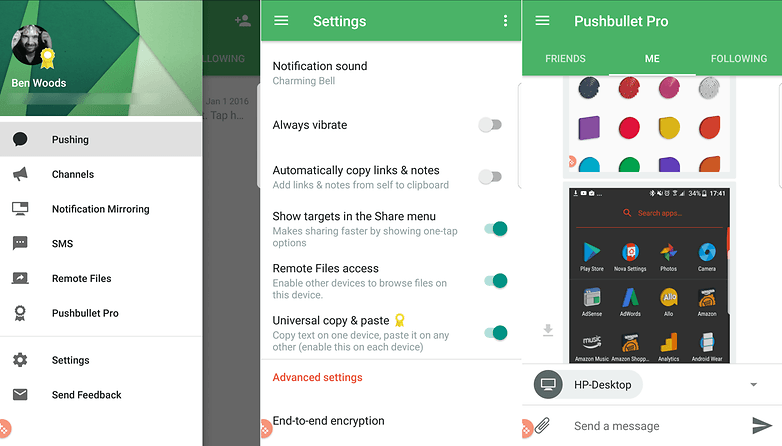
Pushbullet is a super-convenient way to manage files on multiple devices. / © AndroidPIT

Pushbullet - SMS on PC
5. Todoist

Plenty of apps have tried to tackle that perennial problem of helping you actually get things done, but Todoist hits a higher water mark than most. The app enables you to organize your tasks with colors and sub-folders, and it can sync your lists between multiple devices (though it also works if you go offline).

It was previously named one of the best Google Play apps by Google itself, and it's easy to see why — the interface is clear and uncluttered, creating and editing tasks is very straightforward, and extra features such as being able to assign custom tags to keep everything organized really add to the app's overall impact on your productivity.

Again, you'll need to pay for a subscription if you want to use the more advanced features, like tags, but basic lists and syncing between devices is free to all.


Best note taking apps for Android: the definitive list for organizing your life

One of Todoist's key appealing factors is its simplicity. / © AndroidPIT

Todoist: To-do lists for task management & errands
6. Trello

Trello allows you to keep on top of multiple projects and tasks without collapsing in a heap of information overload. If you need to be able to check in on several different projects at once from your smartphone or tablet then Trello is one of the best ways to go about it.

The app is based around cards — each card can have members, labels, dates and other information attached to it, so it's simple to use despite being very powerful. Everything is synced to the cloud as well so you can access your Trello account from the web as well as your mobile devices.

Trello's handy card-based system helps you keep track of disparate tasks. / © AndroidPIT

Trello
7. DropTask

If you need a to-do list app, but find that simply having lists isn't enough to keep you organized and on track, DropTask could be worth a look, as it takes a more visual approach to your list of jobs. It's also accessible via the desktop too, which is handy.

It's designed for team collaboration, so you can assign tasks and track progress across different tasks for different people within the app itself. And yep, you guessed it, all this organisation takes place through dragging and dropping the tasks.

The free version of the app allows you to create up to five projects for free, with unlimited tasks and groups. If you want to remove this restriction and get access to other features (like assigning tasks to team members) then you'll need to pay for the service.Also Read:10 Websites to Watch Indian Live Television


If traditional to-do lists don't work, try DropTask. / © DropTask

DropTask - Visual To Do List
8. IFTTT

If you haven't yet discovered IFTTT then you're in for a treat — it lets you combine various apps and services together to help you get more done. They used to be called 'recipes' but are now called 'applets' instead.

So, for example, if you want to automatically send a map of your location to your Gmail account with a tap on an Android Wear device, sync Dropbox files to other services, switch on your lights or other internet-connected devices around the home or many, many more things, then IFTTT is a one-stop-shop of productivity.

Triggers can be set based on your Android device's location or a specific date and time, and creating your own applets is simple too. If you use android phones, please choose Gihosoft Android Data Recovery.With Gihosoft Android Data Recovery, no longer afraid of data loss!


IFTTT - everything you need in one place. / © AndroidPIT

IFTTT
9. Solid File Explorer

If you're using your smartphone as a mobile workstation, then a file manager app is essential, but depending on your manufacturer, your device may not come with one. While there are many good file manager apps with different strengths and weaknesses, Solid File Explorer may be the best overall.

The app has an elegant material design and a simple dual display function to let you drag and drop files into different folders. Other features of note are integration with cloud storage solutions such as Dropbox, Google Drive and OneDrive, and support for Chromecast.

Currently, the app is offering a 14-day free trial. After that, it's $2 to unlock the full version, which is a great price for a very useful app.

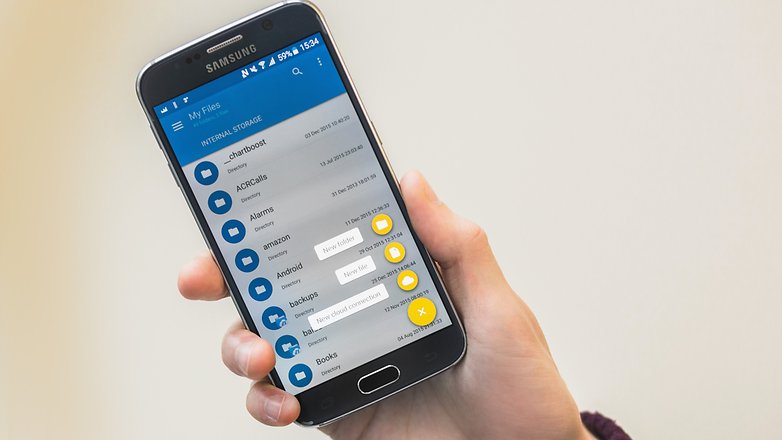
Solid Explorer's twin panels and cloud storage support make it a standout app. / © ANDROIDPIT

Solid Explorer File Manager
10. Otter Voice Notes

Otter is a productivity app centered around organizing your voice conversations. It records audio from your device and creates transcriptions, that can be annotated with speaker identification, photos, searchable playback, shareable links and more. Whether you run a business, work in media or journalism or need to keep your study notes in order, this handy app will help you keep all the voice info you have from interviews, meetings, etc. easily accessible and sortable. The free plan offers users 600 minutes of transcribed audio every month. A $9.99-per-month subscription multiplies it to 6,000 minutes.

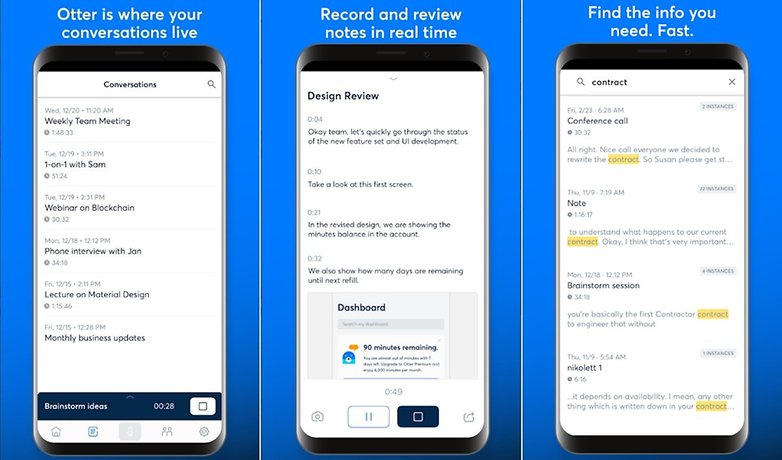
Just because something happens by voice doesn't mean it can't be in your notes! / © AndroidPIT (screenshot)

Get it on the Play Store

Featured Post

Elephone M3 News

Elephone M3 comes in two versions, both with the integration of aviation aluminum body and have Rose Gold, Champagne Gold, Smoky Grey ...